
こんな方におすすめ
- Shopifyでオリジナルテーマを作成したい
- Shopifyで固定ページを作成したい
- Shopifyでパンくずリストを作成したい

はじめに
Shopifyオリジナルテーマを作成しよう、の第6回は「Aboutページの作成」です。
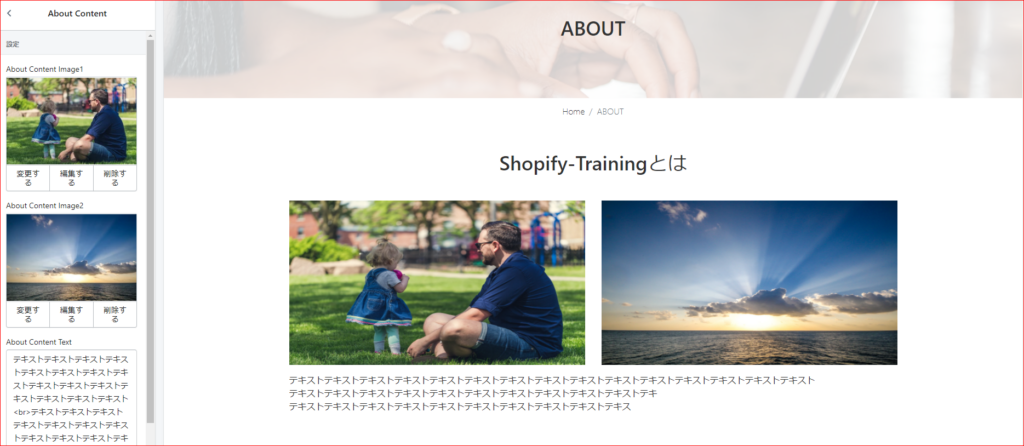
こんな感じに、テキストや画像を管理画面から編集できる機能と、パンくずリストを作成していきます。
今回の学習を通して学べることは主に以下の2つです。
- 固定ページの作成方法
- パンくずリストの作成方法
今回のコードは下記リンクにまとめてあるので参考にしてみてください。(branch:no6)
また、今回のテーマのもとのhtmlは第1回の記事に公開してあるので、そちらからダウンロードをお願いします。
Aboutページを作成しよう
固定ページを作成しよう
固定ページは以下の2手順で作成可能です。
- page.xxxx.liquidページを作成
- 管理画面からページを作成
まず、page.about.liquidを作成していきます。
templatesフォルダの中に「page.about.liquid」ファイルを作成してください。
templates
page.about.liquid
続いて、ページを作成していくのですが、Aboutページは第3回のヘッダー作成時に作成したので、今回はそれを編集していきます。
管理画面の「オンラインストア」→「ページ」→「About」を選択します。
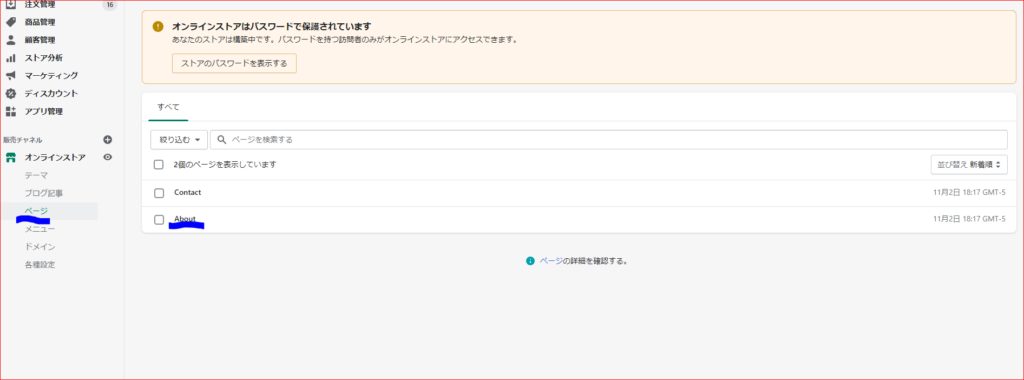
テンプレートの部分を「page.about」に変更します。
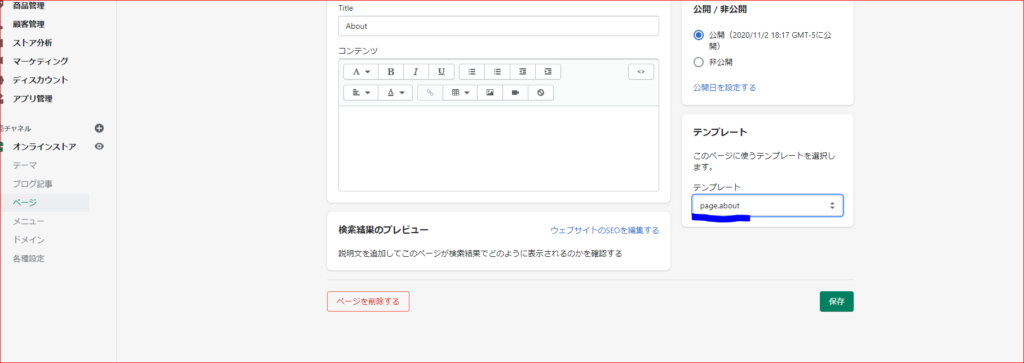
保存をして、完了です。
Aboutページを編集しよう
page.about.liquidを編集していきます。
今回は、トップの画像、パンくずリスト、コンテンツを作成したいので、3つのファイルを呼び出します。
下記コードをpage.about.liquidに貼り付けてください。
{% section 'about-header' %}
{% render 'breadcrumbs' %}
{% section 'about-content' %}
{% render 'xxxxxx' %}を使うことで、snippetsフォルダのファイルを呼び出すことができます。
以前までは{% include 'xxxxxxx' %}が使用されていましたが、現在ではrenderが推奨されています。
なので、新たに3つファイルを追加しましょう。
sections
about-header.liquid
about-content.liquid
snippets
breadcrumbs.liquid
about-header.liquidに下記コードを貼り付けてください。
<div class="subpage_bg_img d-flex justify-content-center align-items-center" style="background-image: url('{{section.settings.about_header_image | img_url: '1920x'}}');">
  <h2 class="f36">ABOUT</h2>
</div>

{% schema %}
{
	"name": "About Header Image",
	"settings": [
		{
			"type": "image_picker",
			"id": "about_header_image",
			"label": "About Header Image"
		}
	]
}
{% endschema %}
やっていることはトップページの画像を設置したときと同じなので、下記ページを参考にしてみてください。
続いて、about-content.liquidに下記コードを貼り付けてください。
<div class="main">
  <div class="container">
    <h3 class="text-center mb-5 f36">Shopify-Trainingとは</h3>
    <div class="row">
      <div class="col">
        <img src="{{section.settings.about_content_image1 | img_url: '1920x'}}" alt="" width="100%" height="300px" class="cove_img">
      </div>
      <div class="col">
        <img src="{{section.settings.about_content_image2 | img_url: '1920x'}}" alt="" width="100%" height="300px" class="cove_img">
      </div>
    </div>
    <div class="mt-3">
      <p>{{section.settings.about_content_text}}</p>
    </div>
  </div>
</div>


{% schema %}
{
	"name": "About Content",
	"settings": [
		{
			"type": "image_picker",
			"id": "about_content_image1",
			"label": "About Content Image1"
		},
		{
			"type": "image_picker",
			"id": "about_content_image2",
			"label": "About Content Image2"
		},
		{
			"type": "textarea",
			"id": "about_content_text",
			"label": "About Content Text"
		}
	]
}
{% endschema %}
これも新しく学ぶ部分はほとんどありません。
文章の部分は、テキストエリアを使用したいので
"type": "textarea"
を使用しています。
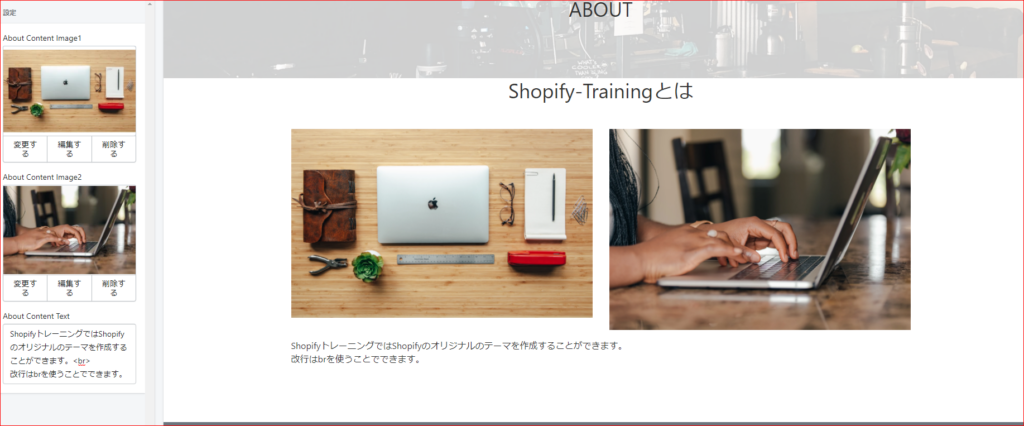
画像とテキストを配置することができました。
パンくずリストを作成しよう
続いてパンくずリストを作成していきます。
Shopifyでは公式がデフォルトのコードを公開しているのでそれを編集していきます。
まずはデフォルトの下記コードをbreadcrumbs.liquidに貼り付けてください。
{% unless template == 'index' or template == 'cart' or template == 'list-collections' %}
<nav class="breadcrumb" role="navigation" aria-label="breadcrumbs">
  <a href="/" title="Home">Home</a>
  {% if template contains 'page' %}
    <span aria-hidden="true">›</span>
    <span>{{ page.title }}</span>
  {% elsif template contains 'product' %}
    {% if collection.url %}
      <span aria-hidden="true">›</span>
      {{ collection.title | link_to: collection.url }}
    {% endif %}
    <span aria-hidden="true">›</span>
    <span>{{ product.title }}</span>
  {% elsif template contains 'collection' and collection.handle %}
    <span aria-hidden="true">›</span>
    {% if current_tags %}
      {% capture url %}/collections/{{ collection.handle }}{% endcapture %}
      {{ collection.title | link_to: url }}
      <span aria-hidden="true">›</span>
      <span>{{ current_tags | join: " + " }}</span>
    {% else %}
      <span>{{ collection.title }}</span>
    {% endif %}
  {% elsif template == 'blog' %}
    <span aria-hidden="true">›</span>
    {% if current_tags %}
      {{ blog.title | link_to: blog.url }}
      <span aria-hidden="true">›</span>
      <span>{{ current_tags | join: " + " }}</span>
    {% else %}
    <span>{{ blog.title }}</span>
    {% endif %}
  {% elsif template == 'article' %}
    <span aria-hidden="true">›</span>
    {{ blog.title | link_to: blog.url }}
    <span aria-hidden="true">›</span>
    <span>{{ article.title }}</span>
  {% else %}
   <span aria-hidden="true">›</span>
   <span>{{ page_title }}</span>
  {% endif %}
</nav>
{% endunless %}
参考:https://shopify.dev/tutorials/customize-theme-add-breadcrumbs
デフォルトではこういうデザインです

デフォルトでは、どのようなページ(ブログでも商品ページでも固定ページでも)が来てもパンくずリストが正常に表示されるような機能がついています。
この機能を維持したままデザインのみを変更します。
下記コードに変更をしてください。
{% unless template == 'index' or template == 'cart' or template == 'list-collections' %}
<nav class="mb-5" role="navigation" aria-label="breadcrumbs">
  <ol class="breadcrumb bg-white d-flex justify-content-center">
    <li class="breadcrumb-item"><a href="/">Home</a></li>
    {% if template contains 'page' %}
    <li class="breadcrumb-item active" aria-current="page">{{ page.title }}</li>
    {% elsif template contains 'product' %}
    {% if collection.url %}
    <li class="breadcrumb-item active" aria-current="page">{{ collection.title | link_to: collection.url }}</li>
    {% endif %}
    <li class="breadcrumb-item active" aria-current="page">{{ product.title }}</li>
    {% elsif template contains 'collection' and collection.handle %}
    {% if current_tags %}
    {% capture url %}/collections/{{ collection.handle }}{% endcapture %}
    <li class="breadcrumb-item">{{ collection.title | link_to: url }}</li>
    <li class="breadcrumb-item active">{{ current_tags | join: " + " }}</li>
    {% else %}
    <li class="breadcrumb-item active" aria-current="page">{{ collection.title }}</li>
    {% endif %}
    {% elsif template == 'blog' %}
    {% if current_tags %}
    <li class="breadcrumb-item">{{ blog.title | link_to: blog.url }}</li>
    <li class="breadcrumb-item active">{{ current_tags | join: " + " }}</li>
    {% else %}
    <li class="breadcrumb-item active" aria-current="page">{{ blog.title }}</li>
    {% endif %}
    {% elsif template == 'article' %}
    <li class="breadcrumb-item">{{ blog.title | link_to: blog.url }}</li>
    <li class="breadcrumb-item active" aria-current="page">{{ article.title }}</li>
    {% else %}
    <li class="breadcrumb-item active" aria-current="page">{{ page_title }}</li>
    {% endif %}
  </ol>
</nav>
{% endunless %}
基本的にはspanのみで構成されていた部分を、ul と liタグを使って修正したくらいです。
ゼロからパンくずリストを作成した方がデザインを自由に組めるため良いのですが、書き落としや見落としがあると大変なのでデフォルトのコードをできるだけいじらないようにしました。

パンくずリストを表示することができました。
まとめ
今回は以下の2つを主に行いました。
- 固定ページの作成方法
- パンくずリストの作成方法
今回のコードは下記リンクにまとめてあるので参考にしてみてください。(branch:no6)
なお、質問や要望がありましたら、お問い合わせフォームまたはコメント欄によろしくお願いします。
次回はお問い合わせページを作成していきます。
ページ一覧
全体像の確認
https://agata-code.com/programming/original-no1/
開発環境のセット
https://agata-code.com/programming/original-no2/
ヘッダーの作成
https://agata-code.com/programming/original-no3/
フッターの作成
https://agata-code.com/programming/original-no4/
トップページの作成
https://agata-code.com/programming/original-no5/
Aboutページの作成
https://agata-code.com/programming/original-no6/
お問い合わせフォームの作成
https://agata-code.com/programming/original-no7/
コレクションページの作成
https://agata-code.com/programming/original-no8/
個別商品ページの作成
https://agata-code.com/programming/original-no9/
カートページの作成
https://agata-code.com/programming/original-no10/
ブログの作成
https://agata-code.com/programming/original-no11/
ログイン機能の実施