こんな方におすすめ
- Shopifyでテーマカスタマイズしたい人
- Shopifyで認証機能を付けたい人
はじめに
Shopifyオリジナルテーマを作成しよう、の第12回は「ログイン機能の作成」です。
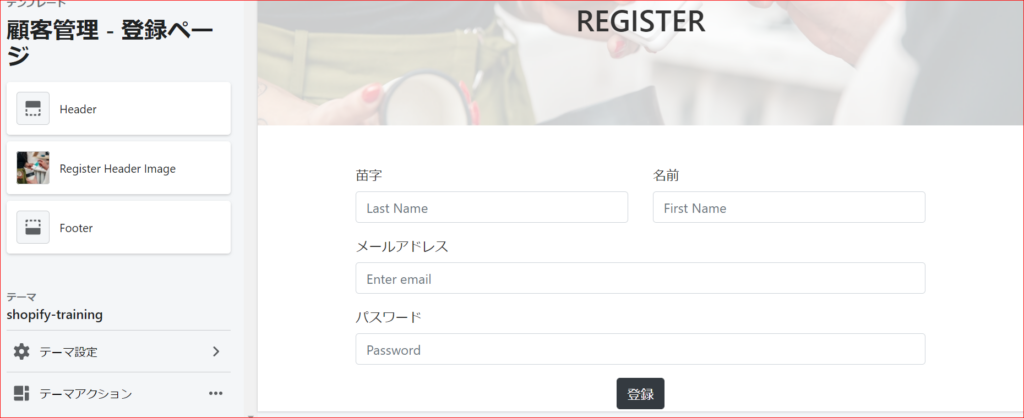
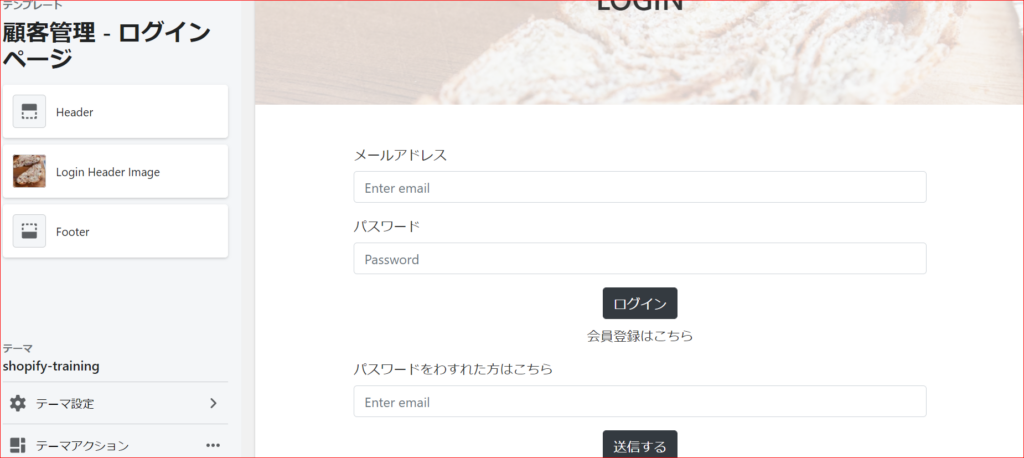
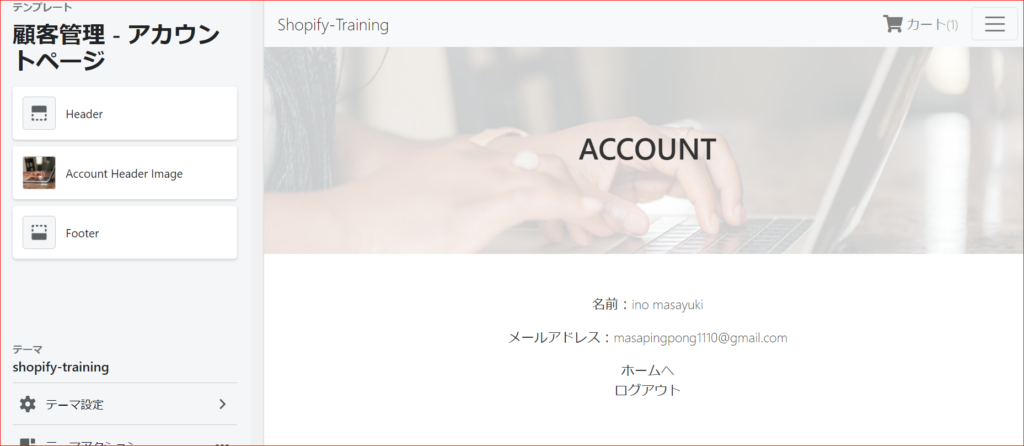
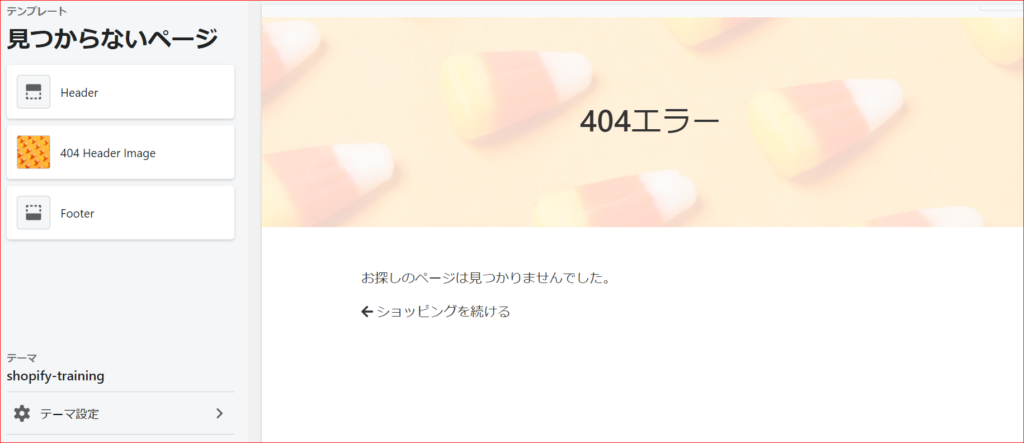
下の画像のようなページを作成します。
今回の学習を通して学べることは主に以下の3つです。
- アカウント登録機能
- ログイン機能
- パスワードリセット機能
今回のコードは下記リンクにまとめてあるので参考にしてみてください。(branch:no12)
また、今回のテーマのもとのhtmlは第1回の記事に公開してあるので、そちらからダウンロードをお願いします。
認証機能
Shopifyで与えられている認証機能について
まず、Shopifyで与えられている認証機能について説明します。
Shopifyではtemplatesフォルダの中にcustomersフォルダがあります。
その中には複数のファイルが入っており、Shopify公式がテンプレートを下記リンクで公開しています。
- account.liquid・・・アカウントページ
- activate_account.liquid・・・アカウントを有効にするかどうかのページ
- addresses.liquid・・・発送の住所を管理するページ
- login.liquid・・・ログインページ
- order.liquid・・・過去に注文したものを管理するページ
- register.liquid・・・アカウント登録ページ
- reset_password.liquid・・パスワードリセットページ
今回はこれらを使って学習を進めていきます。
ヘッダーのメニューを修正しよう
まず、下記画像のようにログインや登録ページへのリンクを作成します。

sectionsフォルダのheader.liquidを下のように編集してください。
//中略
{% for link in linklists.main-menu.links %}
//中略
{% endfor %}
{% if shop.customer_accounts_enabled %}
  {% if customer %}
    <li class="nav-item"><a class="nav-link" href="/account/logout">Log Out</a></li>
  {% else %}
    <li class="nav-item"><a class="nav-link" href="/account/login">Log In</a></li>
    <li class="nav-item"><a class="nav-link" href="/account/register">Register</a></li>
  {% endif %}
{% endif %}
//中略
まず、アカウント追加が認められているかを下記コードで確認しています。
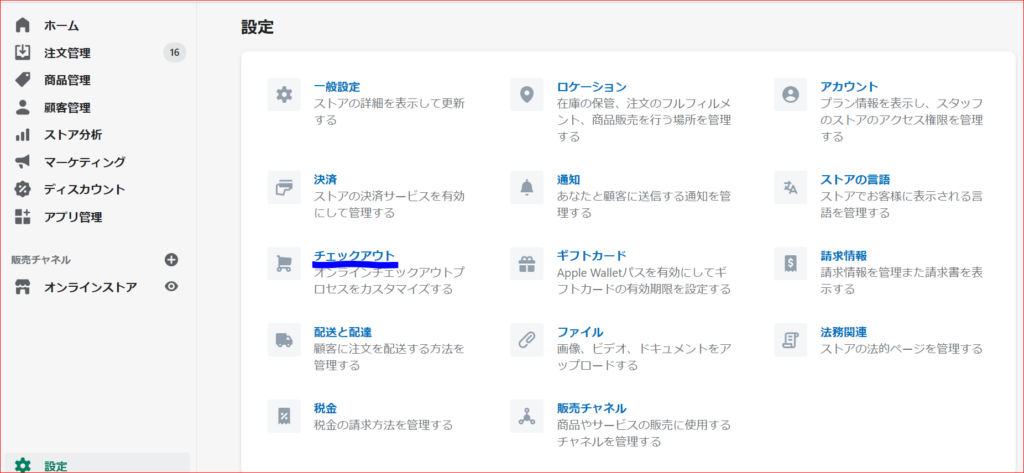
{% if shop.customer_accounts_enabled %}このアカウント追加が認められているかの設定は
「設定」→「チェックアウト」に進みます。
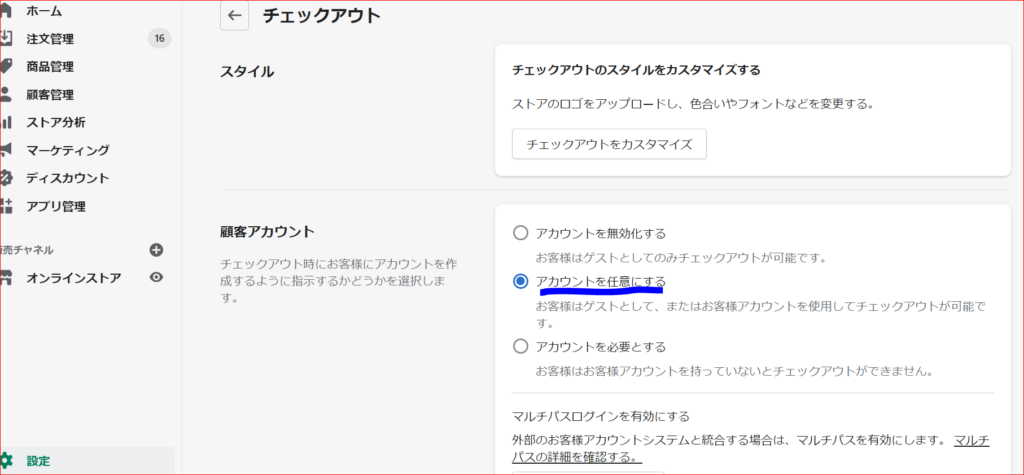
そこの「顧客アカウント」の部分を「アカウントを任意にする」を選択して保存することで設定できます。
下記if文を用いて条件分岐します。
{% if customer %}ログイン状態→Log Outを表示
ログインしていない→RegisterとLog In を表示
とします。
それぞれのページにはaccount/xxxxxとリンクを指定することで移動できます。
これでヘッダーメニューにリンクを設置することができました。
アカウント登録ページを作成しよう
デフォルトテンプレートの解説
続いてアカウント登録ページを作成します。
アカウントの登録はcustomersフォルダのregister.liquidで編集可能です。
何も記載されていないので、下記リンクのテンプレートから解説をしていきます。
https://shopify.dev/docs/themes/theme-templates/customers-register-liquid
ここには下のようなコードを使うように指示されています。
 {% form 'create_customer' %} {{ form.errors | default_errors }}

<label for="first_name">First Name</label>
<input type="text" value="" name="customer[first_name]" size="30" />

<label for="last_name">Last Name</label>
<input type="text" value="" name="customer[last_name]" size="30" />

<label for="email">Email Address</label>
<input type="email" value="" name="customer[email]" size="30" />

<label for="password">Password</label>
<input type="password" value="" name="customer[password]" size="30" />

<input type="submit" value="Create" />

{% endform %}
いろいろ書いてありますが、基本的にはお問い合わせフォーム(page.contact.liquid)のコードと同じなので説明は割愛します。
独自デザインに修正
上記コードを独自デザインに修正します。
register.liquidに下記コードを追加してください。
{% section 'register-header'%}
<div class="main mt-5">
  <div class="container">
    {% form 'create_customer' %} {{ form.errors | default_errors }}
      <div class="form-group">
        <div class="row">
          <div class="col">
            <label for="register_lastname" >苗字</label>
            <input id="register_lastname" type="text" class="form-control" placeholder="Last Name" name="customer[last_name]">
          </div>
          <div class="col">
            <label for="register_firstname" >名前</label>
            <input id="register_firstname" type="text" class="form-control" placeholder="First Name" name="customer[first_name]">
          </div>
        </div>
      </div>
      <div class="form-group">
        <label for="register_email">メールアドレス</label>
        <input type="email" class="form-control" id="register_email" aria-describedby="emailHelp" placeholder="Enter email" name="customer[email]">
      </div>
      <div class="form-group">
        <label for="register_password">パスワード</label>
        <input type="password" class="form-control" id="register_password" placeholder="Password" name="customer[password]">
      </div>
      <button type="submit" class="btn btn-dark d-block mx-auto">登録</button>
      {% endform %}
    <div class="text-center mt-5  ">
      <a href="/account/register" class="mx-2 d-block">ログインはこちら</a>
    </div>
  </div>
</div>
新しい機能は特に付けていないので説明は省きます。
続いて、sectionsフォルダにregister-header.liquidを作成し、下記コードを添付してください。
<div class="subpage_bg_img d-flex justify-content-center align-items-center" style="background-image: url('{{section.settings.register_header_image | img_url: '1920x'}}');">
  <h2 class="f36">REGISTER</h2>
</div>

{% schema %}
{
  "name":"Register Header Image",
  "settings":[
     {
        "type":"image_picker",
        "id":"register_header_image",
        "label":"Register Header Image"
     }
  ]
}
{% endschema %}
これも他のページのヘッダー部分と変わりません。
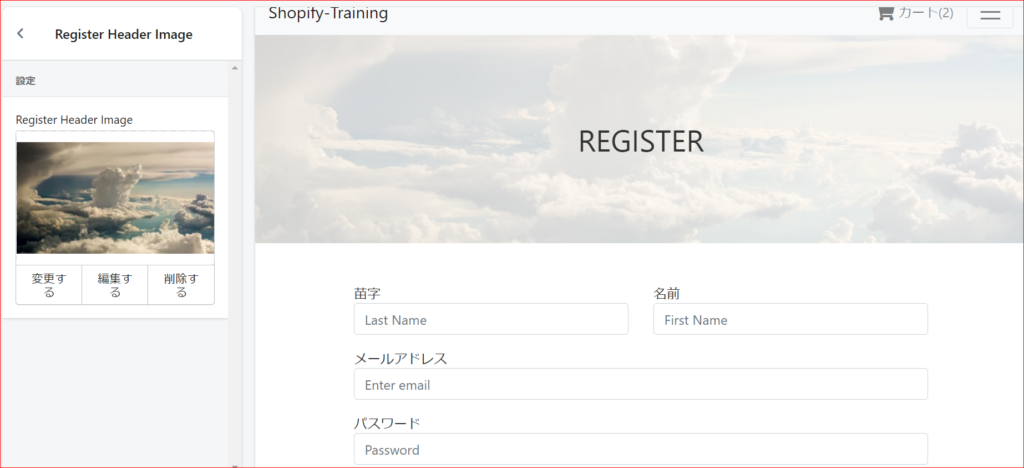
表示することができました。
ログインページを作成しよう
デフォルトテンプレートの解説
続いて、ログインページを作成していきます。
ログインページはcustomersフォルダのlogin.liquidで編集できます。
これも登録ページと同様にファイルに何も記載されていないので、公式ページのテンプレートから編集していきます。
https://shopify.dev/docs/themes/theme-templates/customers-login-liquid
公式には下のようなコードを使うように指示されています。
{% form 'customer_login' %} {{ form.errors | default_errors }}

<label for="customer_email">Email Address</label>
<input type="email" name="customer[email]" />

<label for="customer_password">Password</label>
<input type="password" name="customer[password]" />

<input type="submit" value="Sign In" />

{% endform %}
ほとんどregister.liquidと同じなので説明は割愛します。
独自デザインに修正
デフォルトテンプレートの機能を残しつつ、独自デザインに変更します。
下記コードをlogin.liquidに貼り付けてください。
<!-- /templates/customers/login.liquid -->
{% section 'login-header' %}
<div class="main mt-5">
  <div class="container">
    {% form 'customer_login' %}
    {{ form.errors | default_errors }}
      <div class="form-group">
        <label for="login_email">メールアドレス</label>
        <input type="email" class="form-control" id="login_email" aria-describedby="emailHelp" placeholder="Enter email" name="customer[email]">
      </div>
      <div class="form-group">
        <label for="login_password">パスワード</label>
        <input type="password" class="form-control" id="login_password" placeholder="Password" name="customer[password]">
      </div>
      <button type="submit" class="btn btn-dark d-block mx-auto">ログイン</button>
    {% endform %}
    <div class="text-center mt-2">
      <a href="/account/register" class="mx-2 d-block">会員登録はこちら</a>
    </div>

    {% form 'recover_customer_password' %}
    {{ form.errors | default_errors
    }}
      <div class="form-group mt-3">
        <label for="forget_email">パスワードをわすれた方はこちら</label>
        <input type="email" class="form-control" id="forget_email" aria-describedby="emailHelp" placeholder="Enter email" name="email">
      </div>
      <button type="submit" class="btn btn-dark d-block mx-auto">送信する</button>
    {% endform %}
  </div>
</div>
{% form 'recover_customer_password' %} 上記コードを使うことで、パスワードを忘れたときにメールアドレスを打ち込むとメールが届くようになります。
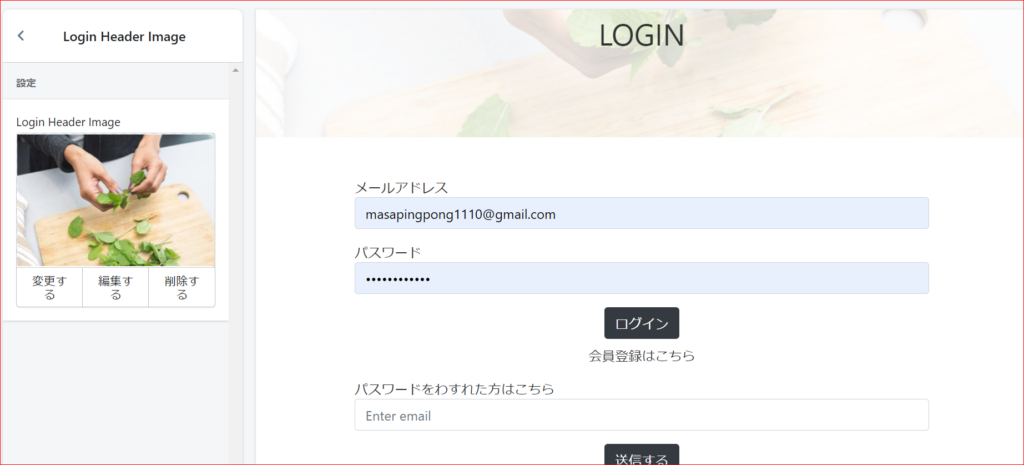
また、login-header.liquidをsectionsフォルダの中に作成してください。
そして、下記コードを貼り付けてください。
<div class="subpage_bg_img d-flex justify-content-center align-items-center" style="background-image: url('{{section.settings.login_header_image | img_url: '1920x'}}');">
  <h2 class="f36">LOGIN</h2>
</div>

{% schema %}
{
  "name":"Login Header Image",
  "settings":[
     {
        "type":"image_picker",
        "id":"login_header_image",
        "label":"Login Header Image"
     }
  ]
}
{% endschema %}
表示することができました。
ログアウトを実装しよう
ログアウト機能は簡単です。
header.liquidに下記コードを追加したと思います。
<li class="nav-item"><a class="nav-link" href="/account/logout">Log Out</a></li>これだけで良いのです。
つまり、リンクで移動すればログアウトができます。
アカウントページを作成しよう
アカウントページの概要
続いて、アカウントのページを作成します。
customersフォルダの中のaccount.liquidを編集していきます。
公式では下のコードのように、注文したものや住所などを表示できるようになっていますが、今回は名前とメールアドレスのみ表示していきます。
https://shopify.dev/docs/themes/theme-templates/customers-account-liquid
{% for order in customer.orders %}
  <!-- order details here -->
{% endfor %}
↑注文したものを表示
{% if customer.default_address %}
  <p>{{ customer.default_address.address1 }}</p>
  {% if customer.default_address.address2 != "" %}
    <p>{{ customer.default_address.address2 }}</p>
  {% endif %}
  <p>{{ customer.default_address.city}}, {% if address.province_code %}{{ customer.default_address.province_code }}, {% endif %}{{ customer.default_address.country }}</p>
  <p>{{ customer.default_address.zip }}</p>
  <p>{{ customer.default_address.phone }}</p>
{% endif %}
↑住所を表示
独自デザインに修正
今回は完全オリジナルのページになります。
下記コードをaccount.liquidに貼り付けてください。
{% section 'account-header' %}

<div class="mt-5 text-center">
  <p>名前:{{customer.name}}</p>
  <p>メールアドレス:{{customer.email}}</p>
  <a href="/" class="d-block">ホームへ</a>
  <a href="/account/logout">ログアウト</a>
</div>
顧客の情報は{{ customer.xxx }} で表示することが可能です。
下記リンクを参考にしてみてください。
続いて、sectionsフォルダの中にaccount-header.liquidを作成し、下記コードを貼り付けてください。
<div class="subpage_bg_img d-flex justify-content-center align-items-center" style="background-image: url('{{section.settings.account_header_image | img_url: '1920x'}}');">
  <h2 class="f36">ACCOUNT</h2>
</div>

{% schema %}
{
  "name":"Account Header Image",
  "settings":[
     {
        "type":"image_picker",
        "id":"account_header_image",
        "label":"Account Header Image"
     }
  ]
}
{% endschema %}
ログインすると自動でアカウントページに移動するので、そこから確認できます。
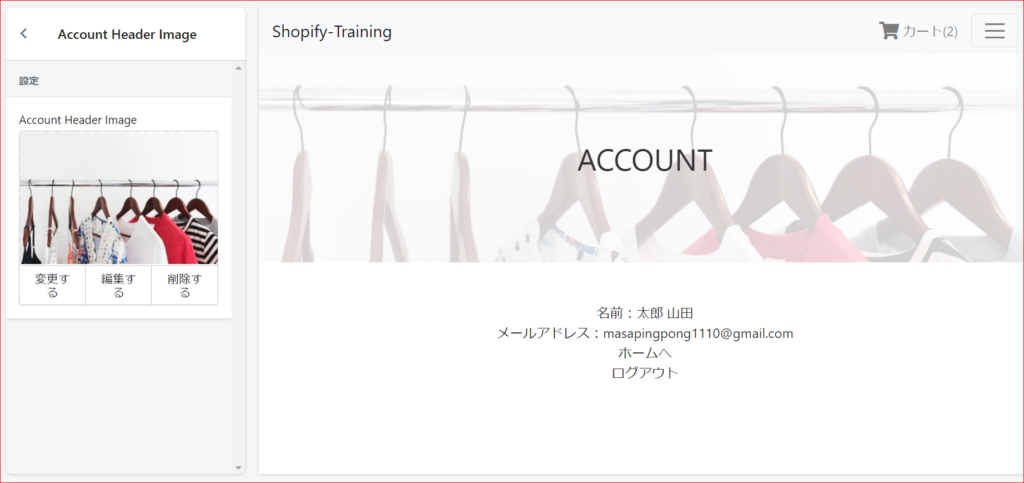
表示が確認できました。
パスワードリセット機能をつけよう
デフォルトテンプレートの解説
続いて、パスワードのリセットのページを作成していきます。
これはreset_password.liquidで編集可能です。
どこで表示されるページかというと、
「パスワードを忘れたためログインページにメールを入力」→「メールが届く」→「開く」
としたときに出てくるページです。
これも毎度同じように、公式のテンプレートを活用します。
https://shopify.dev/docs/themes/theme-templates/customers-reset-password-liquid
{% form 'reset_customer_password' %} {{ form.errors | default_errors
}}

<label for="password">Password</label>
<input type="password" value="" name="customer[password]" size="16" />

<label for="password_confirmation">Password Confirmation</label>
<input
  type="password"
  value=""
  name="customer[password_confirmation]"
  size="16"
/>

<input type="submit" value="Reset Password" />

{% endform %}
独自デザインに修正
それでは上のコードの機能を持たせたまま、デザインを変更していきましょう。
下記コードをreset_password.liquidに貼り付けてください。
{% section 'reset-password-header' %}
<div class="main mt-5">
  <div class="container">
    {% form 'reset_customer_password' %} {{ form.errors | default_errors
    }}
      <div class="form-group">
        <label for="forget_password">パスワード</label>
        <input type="password" class="form-control" id="forget_password" placeholder="Password" name="customer[password]">
      </div>
      <div class="form-group">
        <label for="confirm_password">パスワード(確認)</label>
        <input type="password" class="form-control" id="confirm_password" placeholder="Password" name="customer[password_confirmation]">
      </div>
      <button type="submit" class="btn btn-dark d-block mx-auto">送信</button>
      {% endform %}
  </div>
</div>
また、reset-password-header.liquidをsectionsフォルダに作成し、下記コードを貼り付けてください。
<div class="subpage_bg_img d-flex justify-content-center align-items-center" style="background-image: url('https://cdn.shopify.com/s/files/1/0492/1953/5001/files/collection_top.jpg?v=1603931298');">
  <h2 class="f36">RESET PASSWORD</h2>
</div>
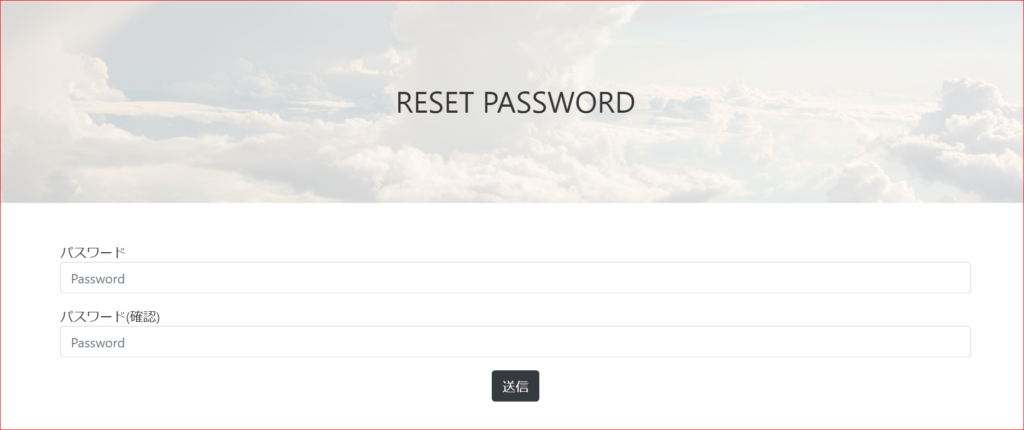
画像のURLの部分は独自の画像のURLを入れてください。
今回はなんで画像を自由にschemaで設定できるようにしなかったというと、下記画像のように管理画面として表示する方法が見つからなかったからです...
(管理画面からパスワードリセット画面を出す方法を知っていたら教えてください...)
これで認証機能は終了です!
その他のページの作成
残りのページを作成していきます。
404ページの作成
まずは、検索したURLが存在しなかったときにでるエラーページを作成します。
これはtemplatesフォルダの404.liquidより編集できます。
404.liquidに下記コードを貼り付けてください。
{% section '404-header' %}
<div class="main">
  <div class="container">
    <p class="mt-5">お探しのページは見つかりませんでした。</p>
    <p><a href="/"><i class="fas fa-arrow-left mr-1"></i>ショッピングを続ける</a></p>
  </div>
</div>
また、sectionsフォルダに404-header.liquidを作成し、下記コードを貼り付けてください。
<div class="subpage_bg_img d-flex justify-content-center align-items-center" style="background-image: url('{{section.settings.error_header_image | img_url: '1920x'}}');">
  <h2 class="f36">404エラー</h2>
</div>

{% schema %}
{
  "name":"404 Header Image",
  "settings":[
     {
        "type":"image_picker",
        "id":"error_header_image",
        "label":"404 Header Image"
     }
  ]
}
{% endschema %}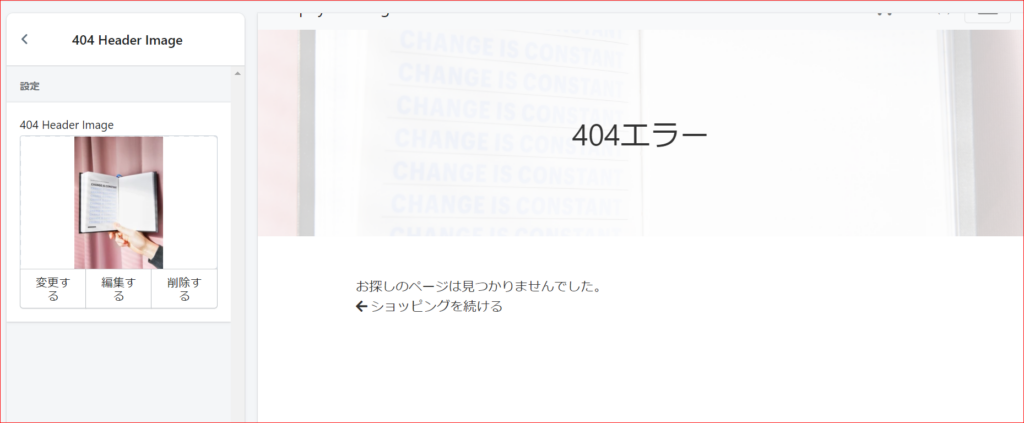
表示することができました。
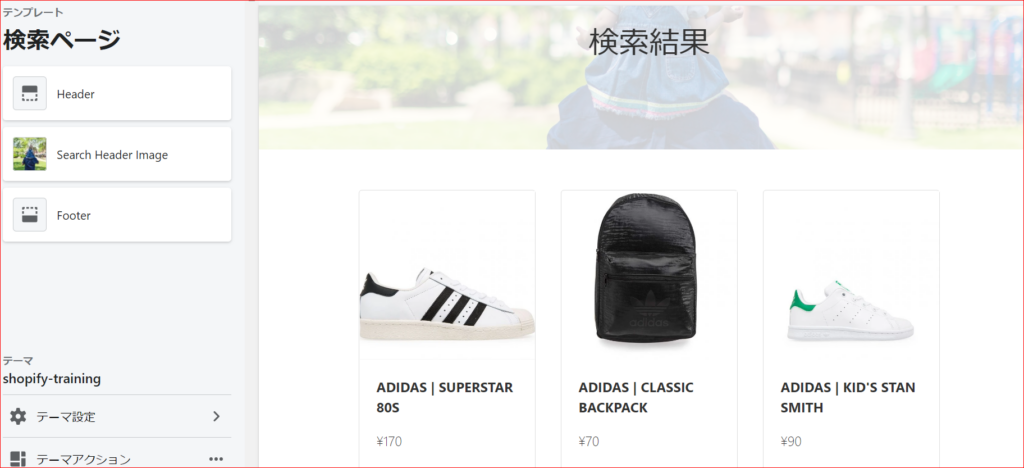
検索結果ページの作成
続いて、検索結果のページです。
これは、templatesフォルダのsearch.liquidを編集することで表示できます。
デフォルトでは下記コードが入っています。
{% paginate search.results by 10 %}
  <form action="/search" method="get" role="search">
    <input type="search" name="q" value="{{ search.terms | escape }}">
    <button type="submit">search</button>
  </form>

  {% if search.performed %}
    {% for item in search.results %}
      {% if item.featured_image %}
        <a href="{{ item.url | within: collection }}" title="{{ item.title | escape }}">
          {{ item.featured_image.src | img_url: 'medium' | img_tag: item.featured_image.alt }}
        </a>
      {% endif %}
      <h5>{{ item.title | link_to: item.url }}</h5>
      <p>{{ item.content | strip_html | truncatewords: 50 }}</p>
    {% else %}
      no results
    {% endfor %}
  {% endif %}

  {% if paginate.pages > 1 %}{{ paginate | default_pagination }}{% endif %}
{% endpaginate %}
基本的にはコレクションページと同じですが、多少違うところもあるので解説します。
- {% paginate search.results by 10 %}・・・search.resultsで検索結果一覧を取得
- <input type="search" name="q" value="{{ search.terms | escape }}">・・・valueに検索したテキストを入れた状態で表示
- search.terms・・・検索したテキスト(検索タイトル)
- {% if search.performed %}・・・もし検索結果があったら
この機能を残したまま、デザインを変更します。
search.liquidを下記コードに変更してください。
{% section 'search-header' %}
<div class="main">
  {% paginate search.results by 6 %}
  <div class="container">
    <div class="row row-cols-sm-3">
      {% for item in search.results %}
      <a href="{{item.url | within: collection}}" class="col-sm mb-3">
        <div class="card position-relative">
          {% unless item.available %}<span class="f26 sold_out text-danger position-absolute">Sold
            Out</span>{% endunless %}
          <img class="item_list_img" src="{{item.featured_image.src | img_url: '1920x'}}" alt="">
          <div class="card-body">
            <p class="card-text font-weight-bold">{{item.title}}</p>
            <p>{{item.price | money}}</p>
          </div>
        </div>
      </a>
      {% else %}
      <p>no matches</p>
      {% endfor %}
    </div>


    {% if paginate.pages > 1 %}
    <nav aria-label="Page navigation example" class="pagination_nav">
      {{ paginate | default_pagination: next: '»', previous: '«' }}
    </nav>
    {% endif %}
    {% endpaginate %}
  </div>
</div>
また、sectionsフォルダにsearch-header.liquidを作成し、下記コードを貼り付けてください
<div class="mb-5 subpage_bg_img d-flex justify-content-center align-items-center" style="background-image: url('{{section.settings.search_header_image | img_url: '1920x'}}');">
  <h2 class="f36">検索結果</h2>
</div>

{% schema %}
{
  "name":"Search Header Image",
  "settings":[
     {
        "type":"image_picker",
        "id":"search_header_image",
        "label":"Search Header Image"
     }
  ]
}
{% endschema %}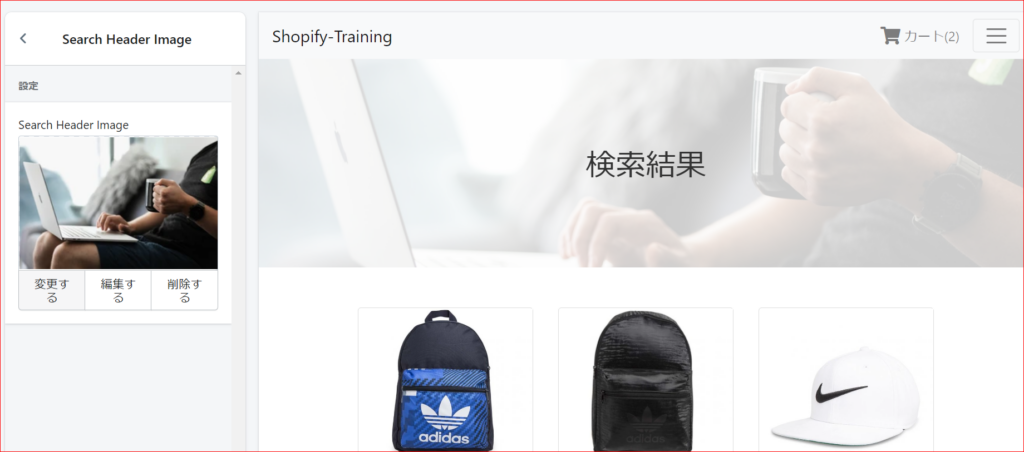
表示することができました。
まとめ
今回は以下の3つを学習しました。
- アカウント登録機能
- ログイン機能
- パスワードリセット機能
今回のコードは下記リンクにまとめてあるので参考にしてみてください。(branch:no12)
なお、質問や要望がありましたら、お問い合わせフォームまたはコメント欄によろしくお願いします。
これで「Shopifyでオリジナルテーマを作成しよう」は終了です!
お疲れ様でした!
これで一通りShopifyのテーマ作成の機能は学習できたと思います。
ですが、Shopifyはまだまだ奥が深く、もっと詳しく学習できます。
Shopifyのドキュメントやコミュニティでどんどん学習を進めていきましょう!
参考文献
register.liquidの概要
https://shopify.dev/docs/themes/theme-templates/customers-register-liquid
login.liquidの概要
https://shopify.dev/docs/themes/theme-templates/customers-login-liquid
account.liquidの概要
https://shopify.dev/docs/themes/theme-templates/customers-account-liquid
顧客情報の取得
https://shopify.dev/docs/themes/liquid/reference/objects/customer
reset_password.liquidの概要
https://shopify.dev/docs/themes/theme-templates/customers-reset-password-liquid
search.liquidの概要
https://shopify.dev/docs/themes/theme-templates/search-liquid
ページ一覧
全体像の確認
https://agata-code.com/programming/original-no1/
開発環境のセット
https://agata-code.com/programming/original-no2/
ヘッダーの作成
https://agata-code.com/programming/original-no3/
フッターの作成
https://agata-code.com/programming/original-no4/
トップページの作成
https://agata-code.com/programming/original-no5/
Aboutページの作成
https://agata-code.com/programming/original-no6/
お問い合わせフォームの作成
https://agata-code.com/programming/original-no7/
コレクションページの作成
https://agata-code.com/programming/original-no8/
個別商品ページの作成
https://agata-code.com/programming/original-no9/
カートページの作成
https://agata-code.com/programming/original-no10/
ブログの作成
https://agata-code.com/programming/original-no11/
ログイン機能の実施
